Varied 18-hole course with stunning views over the Mosel heights – perfect for enjoying golf in a scenic Setting
About the Mosel Course
Golf enjoyment with a view
Our Mosel Course offers everything you need for a great round of golf: varied holes, a natural layout, and stunning views over the Mosel plateau, stretching out toward the Eifel and Hunsrück regions.
Whether you’re new to the game or already have some experience – with us, you’ll find the perfect mix of fun, sporting challenge, and relaxation. Cleverly placed bunkers, biotopes, and water hazards add variety without being overwhelming. The slight elevation changes make the course exciting, yet still enjoyable for hobby golfers.
Our greenkeepers care for the course every day with great attention to detail – ensuring top playing conditions from tee to green. And no matter what your score looks like: the relaxed atmosphere, fresh air, and peaceful surroundings make every round a special experience.
In short: the Mosel Course offers a diverse golfing experience for all skill levels – blending nature, movement, and enjoyment in a unique way.
The tracks in detail
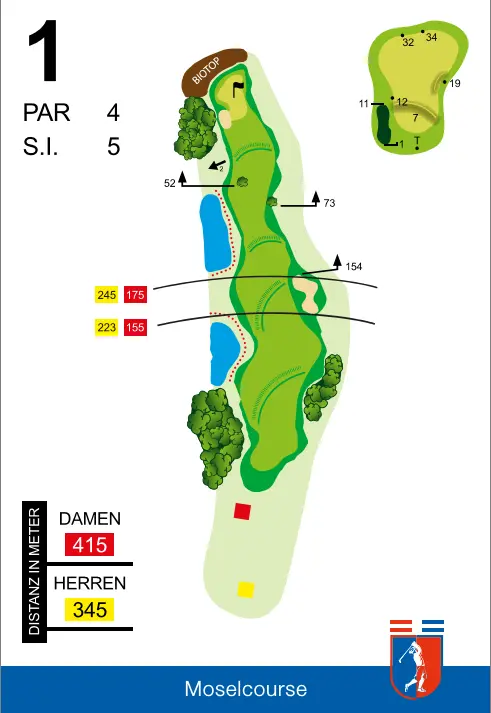
Hole 1
The Mosel Course begins with a slight dogleg left. Long hitters should keep an eye on the front bunker. If the ball lies well on the fairway, it is important to stay straight, as two beautiful trees can sometimes deflect the ball. The green is protected by a bunker on the left and surrounded by biotopes. A large and level green, fast and true to the track.
By loading this video, you agree to the privacy policy of Youtube.
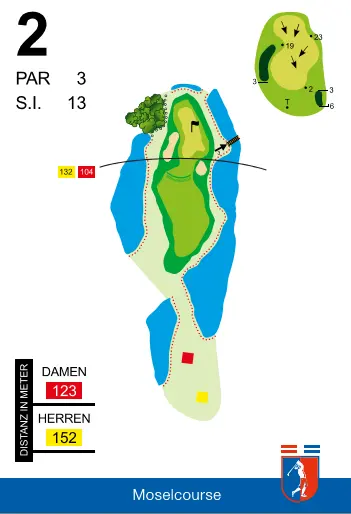
Hole 2
The first par 3 with a good overall length that allows you to land on the green with the first shot. With a slope and a left-hand slope to the green, some balls like to run into the left bunker. The green has a significant slope and the ball is best placed below the flag.
By loading this video, you agree to the privacy policy of Youtube.
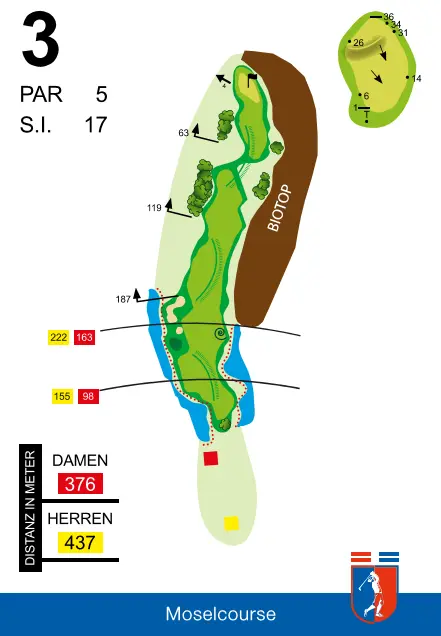
Hole 3
The easiest par 5 on the course. First you go up to the tee and the full splendor of this hole lies before you. However, there is also a pond on the left and a water hazard on the right. The slight slope to the right makes the ball run into the rough. The next shot should be right, stop a little to the left, as the slope increases towards the green.
A level green and a birdie is always possible here.
By loading this video, you agree to the privacy policy of Youtube.
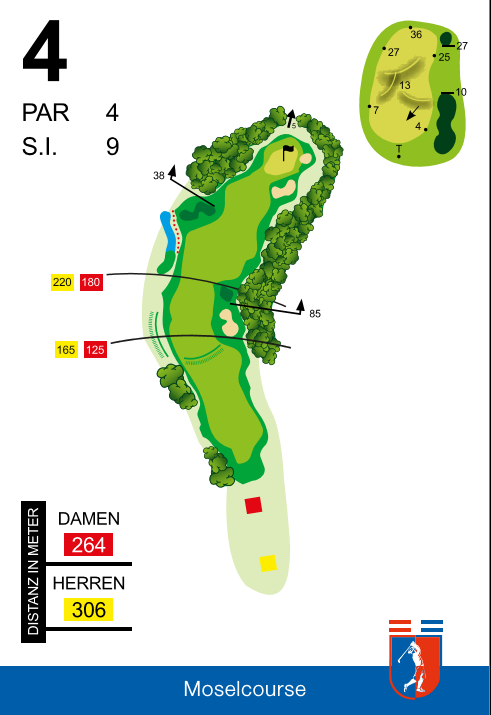
Hole 4
A dogleg to the right and obstacles on the right and left edges of the fairway. The bunker on the right also comes into play. The green is easy to reach with a second shot and then rewards you with a true shot to the PAR.
By loading this video, you agree to the privacy policy of Youtube.
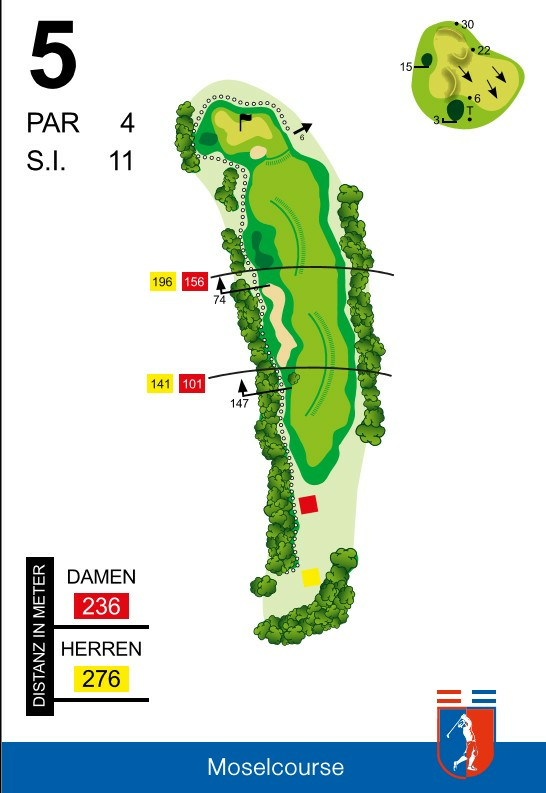
Hole 5
What looks so simple tempts you to hit a powerful tee shot, which can be to the right in the forest or to the left in the house. A tree in the flight path, a long bunker behind it. Strategic play is advised if you want to lie on the elevated green with your second shot. A green undulation needs to be mastered on the uphill putt, which looks so simple, but tempts you to hit a powerful tee shot that can lie in the forest on the right or in the house on the left. Strategic play is advised if you want to lie on the elevated green with your second shot. A green undulation needs to be mastered with an uphill putt.
By loading this video, you agree to the privacy policy of Youtube.
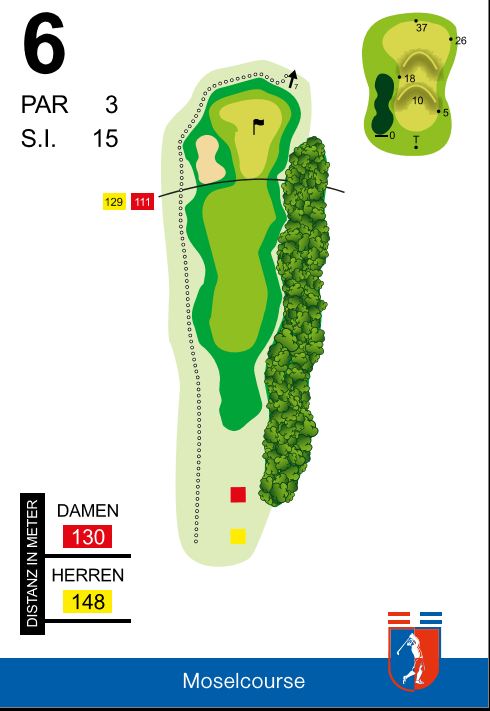
Hole 6
The easiest par 3 on the Mosel Course. The right choice of club depends on the flag position, as with a green depth of 37 m, a large and difficult green awaits here. It is better to stop slightly to the right so that the ball does not end up in the bunker.
By loading this video, you agree to the privacy policy of Youtube.
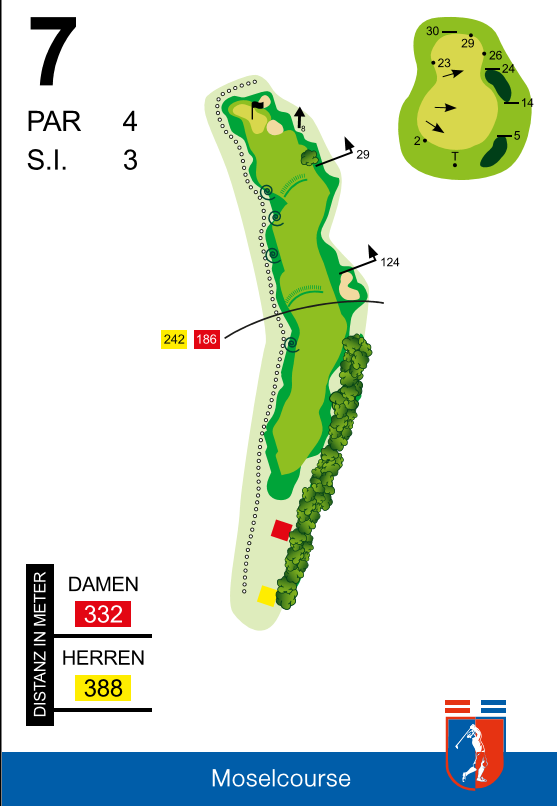
Hole 7
Even very good golfers can be heard groaning on this hole, as it is very difficult to land on the green with the second shot. If you have the necessary length and land in the bend of the fairway, you should aim the ball high, as the green has a slope and is not forgiving of a fast ball. A beautiful and challenging course.
By loading this video, you agree to the privacy policy of Youtube.
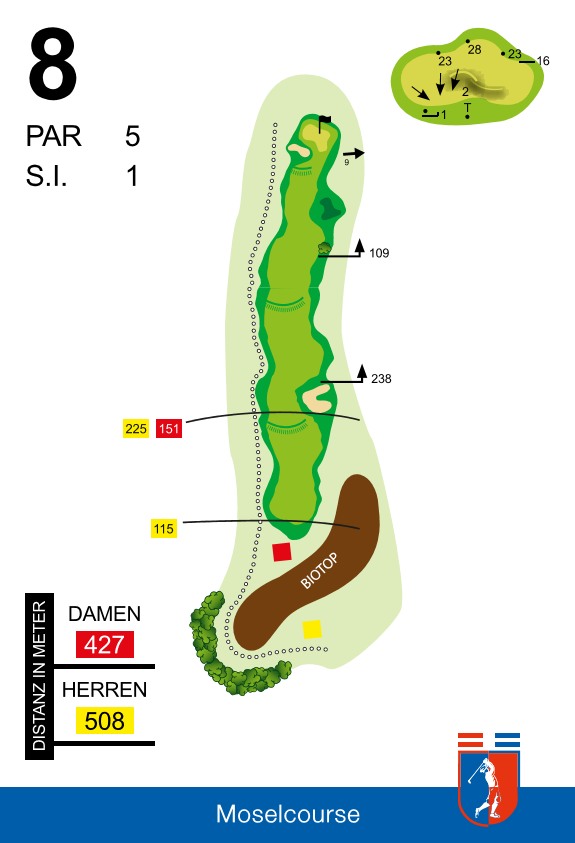
Hole 8
A long monster, but one that is easy to control. The men tee off over a biotope and should be able to hit 120 meters. The ladies are allowed to tee off behind the biotope. The obstacles are manageable, apart from the out of bounds on the left and the biotope on the right. Bunkers only become dangerous near the green. However, the large green is easy to attack and has little slope.
By loading this video, you agree to the privacy policy of Youtube.
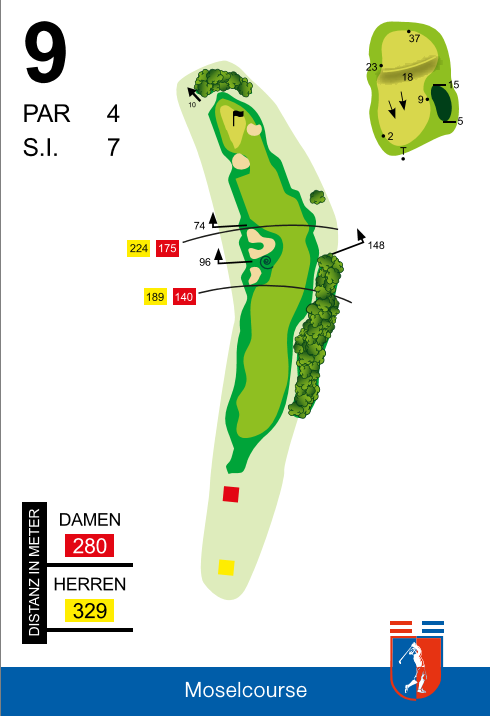
Hole 9
The 9th hole is a beautiful and tricky par 4. Depending on your drive, you can overcome the first bunker or place the ball right on the fairway. After that, the skill level determines the strategy. Two bunkers await in front of the green, which also has a steep downward slope. A par can be tackled quickly and accurately.
By loading this video, you agree to the privacy policy of Youtube.
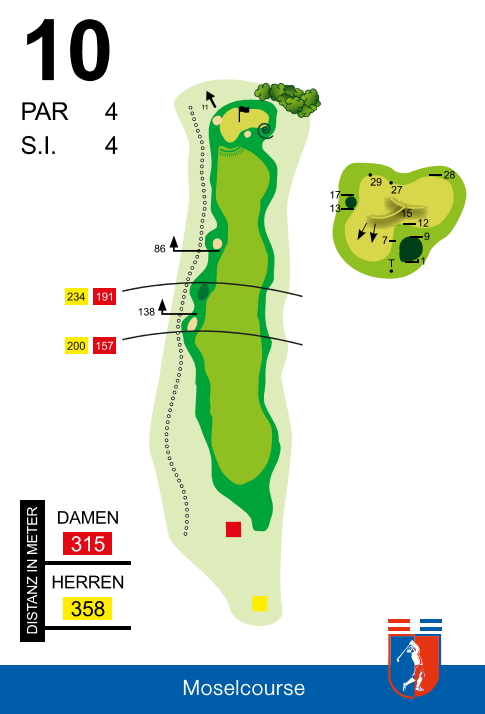
Hole 10
After the walk over the bridge, an open “playing field” awaits us. Straight ahead past the left-hand bunkers, you can reach the green or at least the front green with a good second shot. The position of the flag determines good and less good putts. Positioning the ball below the flag is clearly an advantage.
By loading this video, you agree to the privacy policy of Youtube.
Hole 11
It looks easy, this par 3. Hitting the green and then putting well is rewarded here. There are few obstacles worth mentioning. A great par 3 and always good for a par or birdie.
Watch out for the wind!
By loading this video, you agree to the privacy policy of Youtube.

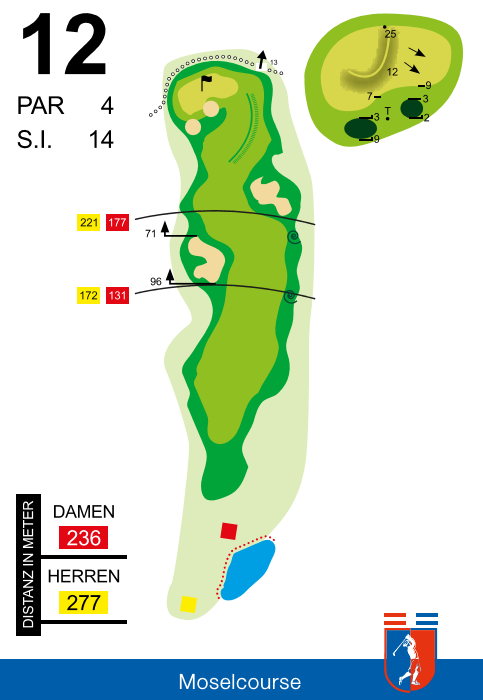
Hole 12
Beware of tailwinds, a good tee shot will then land within 200 m and run right towards the bunker. The green is well defended with two smaller bunkers and the out-of-bounds boundary is in the immediate vicinity. The slope of the green can cost an extra shot.
By loading this video, you agree to the privacy policy of Youtube.
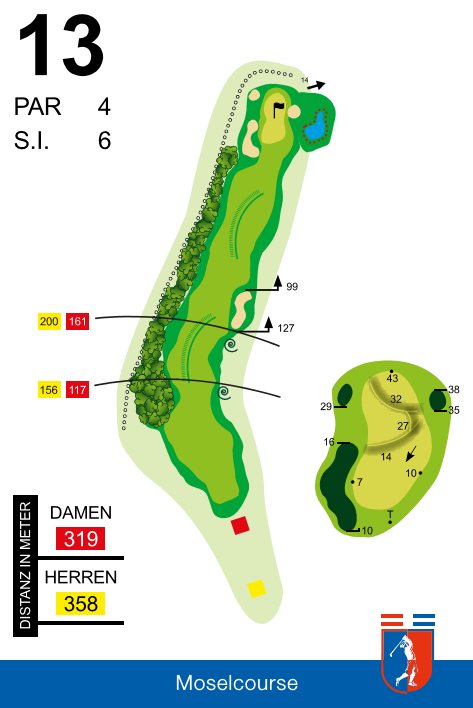
Hole 13
From the forest, send the ball on a long journey. Stop slightly to the right so that it comes to rest on the fairway. The sloping lie makes the ball run into the higher grass. The second shot should be played to the right towards the green, as two unpleasant bunkers await on the left. Depending on the position of the flag, you can expect three putts.
A course that has it all.
By loading this video, you agree to the privacy policy of Youtube.
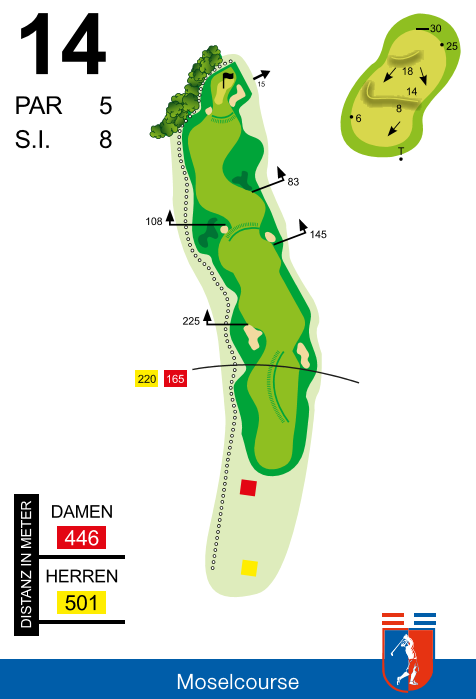
Hole 14
Finally another par 5 for the long hitters, who put the ball in the middle of the fairway, past the bunkers. The course with the most bunkers. After the first hurdle, the next bunkers are already waiting behind a knoll, as well as in front of the green. The green is slightly undulating and allows balls to run into the near out of bounds on the left.
Difficult to play and putt.
By loading this video, you agree to the privacy policy of Youtube.
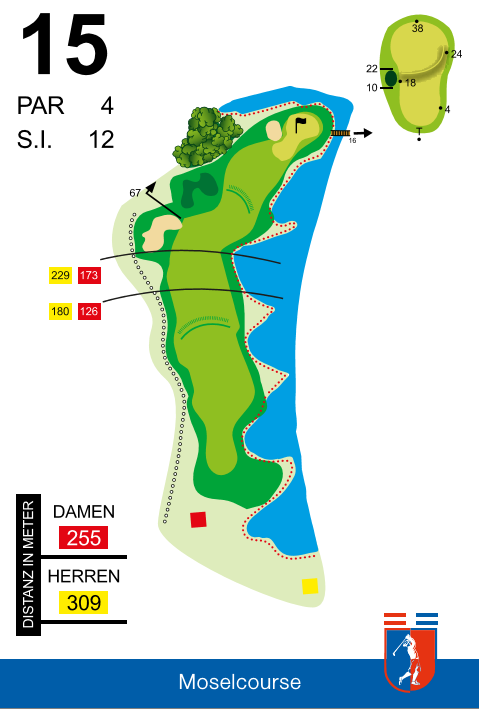
Hole 15
A great dog-leg to the right. From the elevated tee it goes down into the valley and lets the ball travel additional meters. If you are not afraid of the pond on the right and bravely ignore the deep bunker on the left, you will be on a fast, easy-to-play green with your second shot.
By loading this video, you agree to the privacy policy of Youtube.
Hole 16
According to many golfers, this “short par 3” is the most difficult hole for a par 3. It goes uphill, two bunkers spread out at the edges of the green, then there is the sloping green and a bogey or worse is quickly achieved. The approach has to be spot on if you haven’t reached the green with your first shot.
By loading this video, you agree to the privacy policy of Youtube.

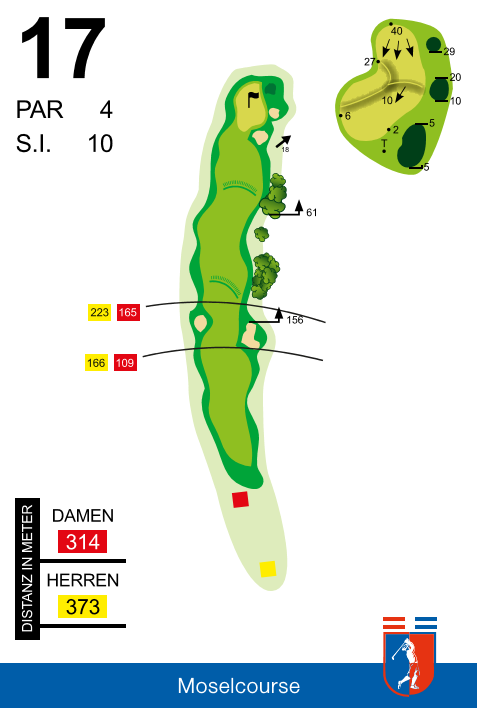
Hole 17
Don’t be distracted by the view of the beautiful landscape and hit the ball carefully. Two bunkers, left and right, await the first tee shot.
The fairway lets the ball run well and rewards a good tee shot. Two more bunkers await on the right side of the green, but the green offers enough space for an accurate shot. A beautiful green, fast and a little tricky, depending on the position of the flag. A very nice course.
By loading this video, you agree to the privacy policy of Youtube.
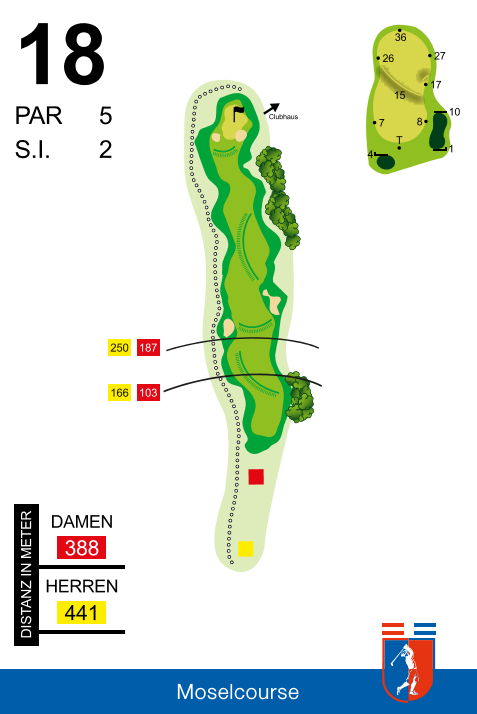
Hole 18
Finally, another monster awaits. Not in terms of length, but because of a “lack of fitness” after a long day of golf. The permanent slope does the rest.
You can attack the green with the third shot. Deep bunkers only come into play in front of and next to the green. The green with the steepest slope does not forgive a putt that is too long. On the plateau, however, it is true to line. The position of the flag determines the shot onto the green. Made it!
By loading this video, you agree to the privacy policy of Youtube.